posted
Haven't been on here for some time but I need to pick a brain or two. I haven't been doing vinyl for a long time but I've got the hang of it at least doing things as long as my arms, and I've done some large panels when I could lay the vinyl flat and then wet the vinyl but now I'm need some advice on applying some reflective vinyl on a piece of fire equipment. There will be three stripes; a 3/4" stripe, then a 6" stripe then another 3/4" stripe. I don't have a slitter so I figure I'd cut it just the way it would go on, the length is about 160" so my question is what is the best way to apply this so I don't mess it up with wrinkles or air bubbles. Do I do it wet or dry? Hinge it? I need to do this in one piece. Any help on this would be greatly appreciated.
-------------------- Kevin Carlson Carlson Art & Sign Madison, IN Posts: 37 | From: Madison, IN 47250 | Registered: Jan 2000
| IP: Logged |
The best way is to stretch the stripe full length, pat it down, then re-lift the starting point to about 1/4 of the way and relay it. A trained eyeball is the best way to judge the correctness of a stripe. This works especially well with anything 1" or less. I'll catch heat for this, but I never apply wet unless I am forced to work in the sunlight
Never go panel by panel. It will look irregular and wavy when you view the overall job. Hope this helps! Call if needed.
[ July 15, 2007, 09:25 PM: Message edited by: Rick Beisiegel ]
""Good judgment comes from experience; and a lot of that comes from bad judgment" - Will Rogers Posts: 3485 | From: Beautiful Newaygo, Michigan | Registered: Mar 2003
| IP: Logged |
posted
you may want to use 1/8 fine line tape for a guide on your 1st few ...this will help train your eye as you look down the side from each end ...yes many will do this dry but wet does give leway like if windy or hot or learning
posted
I would cut & weed as you suggest, then trim a straight top edge through the application tape & the release liner across the entire 160" length about 1/2" - 1" above the top stripe.
I would tape the entire 160" striping into position with a top hinge, then I would get the release liner removal started at the right hand end, removing about 4 feet by pulling it out from behind. (not flipping up the graphic as done on smaller applications)
Maybe using a little rapid tac & I would start squeegeeing down the leading end, careful not to let the graphic start uphill. The doubled over release liner, 4 feet away helps hold the graphic off the vehicle, but if you get too close to it with your squeegeeing, it can force the striping higher then where it belongs, which will be evident by a bulge in the application between your vinyl stripe & your tape hinge. the trick to avoid this is to keep pulling more release liner with my left hand as my right hand follows along squeegeeing down the striping. Also, I will pull the liner a bit & then move my left hand to the application tape ahead of my squeegeeing hand & apply downward pressure to ensure that the striping doesn't go uphill. I have done this at least a dozen times on long stripes with excellent results. When I use Rapid-Tac, I just squirt a little back behind the exposed adhesive each time I advance the removal of the release liner.
posted
It's easy... I worked for an ambulance & rescue truck manufacturing plant and did more than 2 vehicles a day 5 DAYS A WEEK! There could be NO SEAMS or BUBBLES or DUST UNDER THE STRIPES! These were brand new $120,000-$500,000 vehicles!
First measure from the nearest straight edge (this is what is going to make the stripe look crooked, so be sure you are accurate! Draw a line with a grease pencil/china marker... Stand back and look at it, then eye it up (down the line) and make sure it looks straight! Then you can do what Craig said, or just lay up your stripes wet, squeegee down, taking care not to bruise or scratch the stripes. A trick I used was wrapping a soft cloth around the squeegee or some transfer tape.
I don't know what type of reflective Rick is using, but the 3M stuff doesn't work like regular vinyl (I think that is what he is talking about), the 3M STICKS HARD! And works well wet. If you lay it dry and pull it back up, it will rainbow and/or bruise (dark lines)= Garbage.
For tight body seams etc, take care NOT to wet the vinyl near that part, it won't stick in there until the water is gone!
Good Luck!
Posts: 273 | From: Port St. Lucie, FL | Registered: May 1999
| IP: Logged |
posted
Here's how I tackle long straight runs of vinyl when there's not an extra pair of hands around...
Step 1:
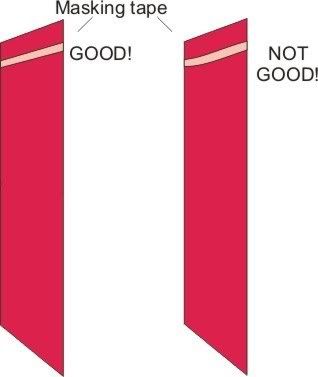
I mark with a china marker at about 2 feet apart at the distance where I want the stripes to be from a top or bottom edge (whichever is closer or truer) and run a piece of 3/4 inch masking tape along the marks above and away from the area where the stripes will be placed.
Step 2: Standing at one end of the surface shows if the marks and tape are truly straight. Any bows in the tape become readily apparent and repositioning the tape to insure a straight guide is a lot easier than repositioning the vinyl later.
Step 3: Leeway for later. I cut the vinyl material 6 inches longer than what is needed overall for a couple of reasons...
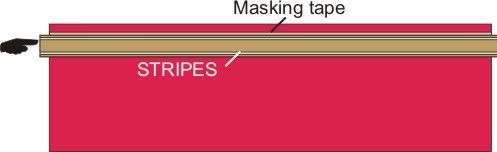
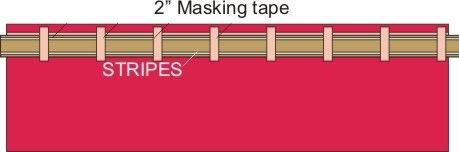
Step 4: Anchoring. Again at about 2 foot increments, I tape the vinyl into position with 2 inch masking tape. With thinner tapes, should one let go, the rest have to take up the extra stress and usually drop one behind the other. The wider tape will support the weight better and makes for less anchor points to remove later.
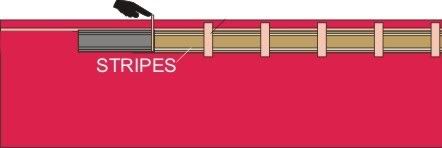
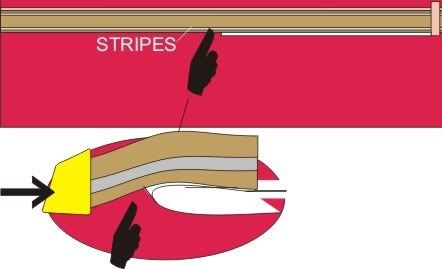
Step 5: Off Center Start. Ideally, removing the backing tape from the center is the way to go, but alone, long runs can be hard to keep a handle on. I stay in my comfort zone. I roll back about 3 feet and use that little extra length to help out by anchoring the vinyl away from the surface with a piece of 3/4 inch tape on the adhesive. This frees my hands to cut the backing paper and concentrate on a clean start.
Step 6: Poor man's bridge. Backing paper's pretty rigid, so I use it to my advantage. I remove all but the last anchor point. That one comes in a few inches, leaving some slack in the run and still giving support. I sneak a hand under the graphic and roll the backing paper towards the surface. It creates a little bridge. As I squeegee the graphic down with one hand I can handle the backing material in shorter runs as I roll the bridge along ahead of it.
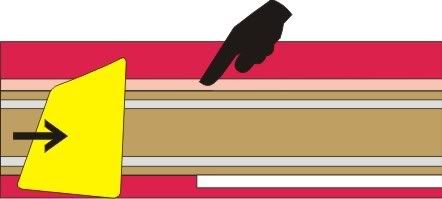
Step 7: As I go, I use on the tape edge as a guide to make sure I'm still on track. TIP: If my "paper pulling" arm is tired and need a quick break, I simply press down on the material ahead of the roller. Gives me a few seconds to let go an relax with losing control of the material. (Hey, it does take a few minutes to go that far...
VVVVVVVVVVVVVVV
[ July 16, 2007, 02:46 AM: Message edited by: Ray Rheaume ]
-------------------- Ray Rheaume Rapidfire Design 543 Brushwood Road North Haverhill, NH 03774 rapidfiredesign@hotmail.com 603-787-6803
I like my paint shaken, not stirred. Posts: 5648 | From: North Haverhill, New Hampshire | Registered: Apr 2003
| IP: Logged |
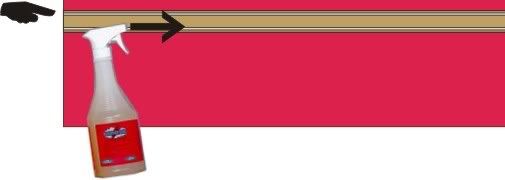
Once the last couple of feet are done, I trim my edges (that extra 6 inches from earlier) off each end with a blade. Although I usually lay down the material dry, I wet down the application tape with Rapid Tac before removing it. This helps loosen the adhesive of the app tape and, by not having to pull as hard, improves the chances of fewer (and with some practice and an occasional blessing from your favorite deity) no bubbles.
What ya get... Three stripes along one guide with just two hands.
Hope this helps... Rapid
-------------------- Ray Rheaume Rapidfire Design 543 Brushwood Road North Haverhill, NH 03774 rapidfiredesign@hotmail.com 603-787-6803
I like my paint shaken, not stirred. Posts: 5648 | From: North Haverhill, New Hampshire | Registered: Apr 2003
| IP: Logged |
posted
Well done, Ray, thanks for the pix and all the effort!
-------------------- "Stewey" on chat
"...there are no limits when you aim for perfection..." Jonathan Livingston Seagull Posts: 7014 | From: Highgrove via Toowoomba, Queensland, Australia | Registered: Dec 2002
| IP: Logged |
posted
I use Ray's method of measuring, marking and using 3/4" masking tape. However, I use my thumb or finger to press just the top edge of the tape onto the surface. After about 3 or 4 ft, I go back and squeegie down the full stripe, using a motion that starts at the top edge and moves down to the bottom edge and using overlapping strokes. Stop squeegying about a foot before the rolled back backing paper, and continue for another 4 ft. or so.
-------------------- Dave Grundy retired in Chelem,Yucatan,Mexico/Hensall,Ontario,Canada 1-519-262-3651 Canada 011-52-1-999-102-2923 Mexico cell 1-226-785-8957 Canada/Mexico home
posted
I use Rapid Tac 2 with Reflective. I am getting better at applying dry, but sometimes I just gotta do it wet. I know this topic will lead into a huge wet-VS-dry monkey poo fight. Love...Jill
Posts: 8834 | From: Butler, PA, USA | Registered: Jan 2001
| IP: Logged |


![[Cool]](cool.gif)


![[Wink]](wink.gif)


 Printer-friendly view of this topic