We've been buried in work for some time now. I seldom get to the board from my desktop anymore so I don't post often.
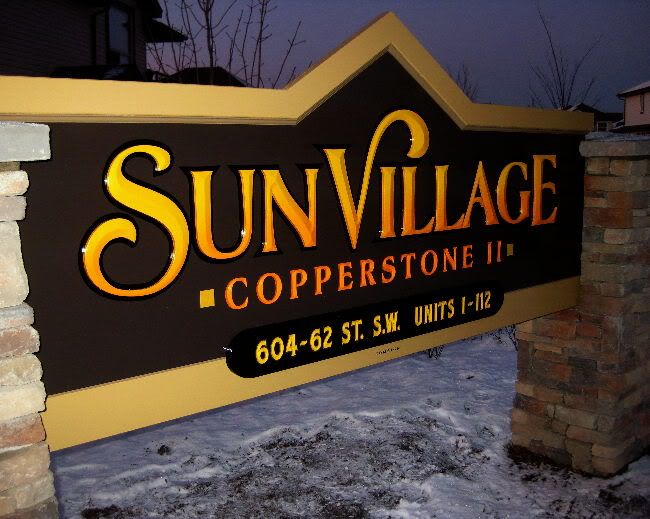
This project went up yesterday. We supplied the concept and design. The pillars were subbed out to our specs. Fit like a glove. Landscaping will have to wait a bit...
The peak shape, some of the colours and the stone were taken from elements on the building... not literally taken.
The graphics are a combination of Prismatic and carved letters. The substrate is 19mm MDO. One shot with hardener was the paint. The prismatic letters were milled from Medex that was sealed and sprayed. The fade is the paint, not the light.
This is a dedication plaque (about 8' long). All text is on the 2nd surface of non-glare acrylic then back sprayed. This was bonded to 9mm clear acrylic. The motif on the left end is dimensionally fabricated from acrylic. Plaque is mounted to the wall with Low Profile Standoff Caps and Barrels...
This one is a plaque in one of our clients Corporate Suites at Rexall Place...
The image is edge printed silver and black and applied on the 2nd surface of non-glare acrylic. The backer panel is metal laminated to acrylic. The face plate stands off the backer 1/2"
This is our bread and butter... wayfinding. We did two directories on the main floor entrances and 2 upstairs, as well as the secondary signage. We did the design, taking inspiration from the building exterior...
Lots of intricate assembly, but worth the effort. The client loves it...
The "smudgy" look around the top decor is a result of reflections from the clear acrylic in the photo, not sloppy painting.
[ December 01, 2011, 11:33 PM: Message edited by: Duncan Wilkie ]
Posted by Joy Kjer (Member # 3026) on :
Duncan, those are great wayfinding signs: lots of information on there but it looks so clean, simple and concise. Thanks for sharing your work pictures.
Posted by Bob Sauls (Member # 11321) on :
Deacon shouts hallelujah from the Amen corner!
Posted by Glenn Taylor (Member # 162) on :
I like'em!!
Posted by Pat Welter (Member # 785) on :
Duncan...These are absolutely grand...Nice work , and nice to see you posting... Pat.
Posted by Neil D. Butler (Member # 661) on :
Beautiful Work Duncan!
Posted by Dennis Raap (Member # 3632) on :
Nice looking signs. I really like the way you did the prismatic letters.
Posted by Mark Fair Signs (Member # 289) on :
Excellent work Duncan!
Posted by Rene Giroux (Member # 4980) on :
Great work bro !
Posted by Dave Sherby (Member # 698) on :
Way to go Duncan. Top notch!
Posted by Duncan Wilkie (Member # 132) on :
Thanks folks. Feel free to ask any questions. Someone emailed me, inquiring about how the SunVillage sign was mounted... The mason did a great job. He left a grove in the stone pillars so my sign would slip right in. He also at my request imbedded 2 2"x2" square steel pipes in the pillars to provide backing for the sign... Posted by Todd Gill (Member # 2569) on :
Great work Duncan -
I'm not quite following the large sign install... is your Sun Village sign two pieces with grooves running through the backs, which correspond to the 2" bars - with the two halves sandwiched together? Or is it a one piece sign slid down the groove and attached to the 2" support bars? Are the support bars offset behind the slots in the brick? Thanks for the explanation - and again, nice work.
Posted by Duncan Wilkie (Member # 132) on :
Thanks Todd. This is a single sided sign, from 3/4" MDO. The pipes are flush to the back of the slot. The sign sits tight against the pipes. The sign is fastened to the pipes. Does this make scence? I don't have a pic of the back of the finished sign. The pipes are exposed.
Posted by Ian Stewart-Koster (Member # 3500) on :
I really like this directory board!
Posted by Todd Gill (Member # 2569) on :
Thanks Duncan! I've got it visualized now - perfect description.
Question: What source do you use for your architectural sign blanks, hardware/offsets - if you don't mind my asking. I'd be interested in looking into that.
Thanks again - and keep on posting - love the portfolio section.
Posted by Duncan Wilkie (Member # 132) on :
Thank you Stewey. Todd all the "blanks" are custom and made in house. The SunVillage is 3/4" MDO The Directory, dedication plaque and welcome sign are Acrylic. You can purchase the Standoff hardware from... Standoffs
We are the Canadian dealer if anyone in Canada has a need.
Posted by Todd Gill (Member # 2569) on :
Thank you Duncan.
Posted by David Harding (Member # 108) on :
As always, nice work.
How come I don't see a ray of sunshine in any of the Sun Village pictures?
Posted by Duncan Wilkie (Member # 132) on :
Thanks David... your post is my ray of sunshine. Posted by Rick Janzen (Member # 7227) on :
Hi Duncan, Sure do like the look of the Sun Village sign. Nice work on all of them. Hope you and your family have a wonderful Christmas.
Posted by Duncan Wilkie (Member # 132) on :
Thanks Rick. All the best of the season to you and yours. Scott and I are off to Red Deer College to install a Post and Panel and Pan sign for the Oil Derrick on campus. Pics to follow on Friday.
Posted by John Arnott (Member # 215) on :
1 question......How do you attach the Medix lettere to a painted surface MDO?
Posted by Duncan Wilkie (Member # 132) on :
Hi John, first 2mil black vinyl was layed down. This created the outline and shadow. 3M adhesive transfer tape (I'll get back to you with the number) was applied to the backs of the letters. Then it was basically peal and stick. This is a permanent bond. I'm never quite comfortable with that alone. So I screwed the letters from the back side as well.
Posted by John Arnott (Member # 215) on :
One more question Duncan, When you say that you "seal" these Medex letters. What exactly are you doing? Won't a good oil base primer work?
Posted by Duncan Wilkie (Member # 132) on :
John, we coated the entire raw letters back and front with Titebond III. Then primer then One-shot w/ hardener.
![[Smile]](smile.gif)


![[Eek!]](eek.gif)