I have a full-faced helmet to airbrush and I am wondering if those that do that kind of work might have any suggestions for me?
What do you use or recommend for a paint mask or film on the curved surface of the helmet?
In the past I have used Sign Strip brand liquid paint mask. I did have some issues with static from over spray when using lettering enamels. More recently I was experiencing issues with static while using matt shelf liner film as a frisket (on flat surface) again using lettering enamels.
This time I believe I will be using all automotive paint in several layers. Most likely I will use single stage paint to work up the design then clear coat the whole thing with some pearl powder tossed in.
There is a spray can frisket material called Glide Coat that was recommended to me today? Anyone use it?
Or is it just better to mask off the helmet using transfer tape. And if so which kind/tack works the best? I will need to mask off the whole helmet at least twice.
I am also wondering if there is anyone near the Milwaukee area who could cut out some paint mask lettering on their plotter?
Hope you can help....this will make my upcoming Go-Kart job much easier and my little 6 year old Great-Niece very happy....thank you
Posted by Dale Feicke (Member # 767) on :
Dale, the liquid mask material is very good, but it takes a long time to dry, so your job will take longer to do. There are several types of paint that are more modern and faster to use.
If you're working with smaller areas, I'd use transfer tape, high tack. Auto Air is a good paint, an acrylic base that dries very fast. Createx is another similar brand. Many colors are available, and most urethane clearcoats will go over it with no problems.
Without knowing exactly what kind of artwork you're doing, that would be the route I'd go.
Some art supply stores sell an 'anti-static' spray, or sometimes you can take a piece of electrical wire with an alligator clip on one end. Clip the wire to the helmet and ground the other end to a ground (electrical box, conduit, etc.) We used to do that with fiberglass bodies.
Posted by Dale Manor (Member # 4858) on :
Thanks for the pointers Dale.
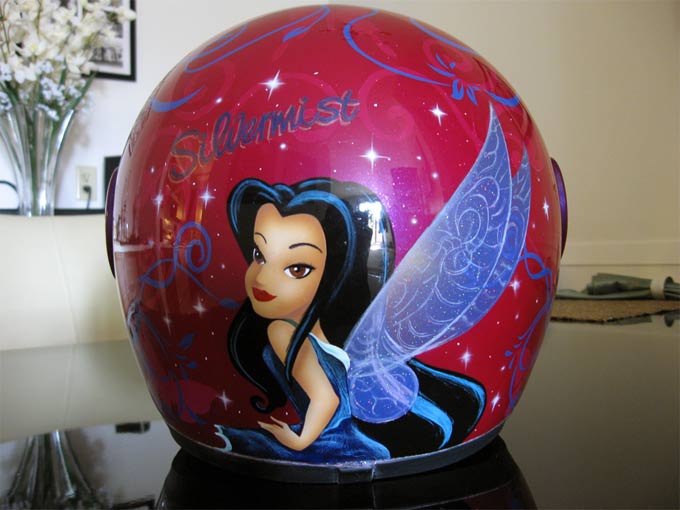
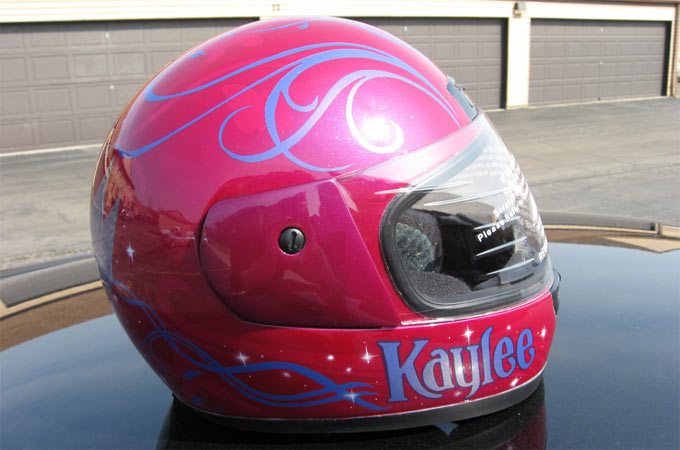
Here is a real rough concept rendering of what I am trying to achieve. There may be more layers to this. I found two colors loaded with pearl and metallic that I think are going to work out well. And I will be painting Silvermist the Fairy (TinkerBell's side kick) on the back of the helmet. And it could use more Fairy Dust. This should be good fun!
Anyone???? No airbrushers out there in Letterville??
Perhaps I'll have to call Australia for some tips.....Mr. Tickle......where are ya mate?
Posted by Neil D. Butler (Member # 661) on :
When using Base clear the static problem seems to dissapear, that's just my experience, I sometimes just wipe it down with a rag dampened with water to get rid of static when I used to use one shot.
Nice Design Dale, are you going to spray the scroll work or do that by hand? Because it seems to me that you really would'nt need any frisket if you are doing it using a scroll brush.
Posted by Dale Feicke (Member # 767) on :
Since seeing the concept, I'd agree with Neil that you could probably do without all the frisket/masking mess. Base coat, do the scrolls and dots with a brush, then clear. Simpler is always better.....and way less costly.
I think in this case, I'd be tempted to use HOK urethane striping paint, or at least put a little hardener in the 1Shot. I've never tried striping with the AutoAir-type paints, maybe someone else here has.
Posted by George Perkins (Member # 156) on :
Definately hand paint the scrolls. Trying to do all that fine line work with a mask is just asking for trouble. A long liner will make short work of that end of the job. You can use the automotive base for the scrolls. If you are worried about mistakes, shoot a couple of coats of clear on the base before you do the scrolls.
Posted by Jim Moser (Member # 6526) on :
I agree with everything the others said... no need for masking...I would do it all with a brush and HOK urethane. Basecoat...Clear...Graphics...final clear. I would not put any pearl in the final clear as it will soften the graphics too much....Just use pearl in the clear over the base coat. There is also something called micro sequins or diamond dust which would give you the fairy dust effect...just a tiny bit in the mid coat clear. If you can't find any I could send you some. Coast Airbrush might have it. They also sell HOK paints in small quantities. Posted by Stephen Deveau (Member # 1305) on :
My two cents worth!
I would cover the helmet with your base Pearl Colour and have it clearcoated.
Do a fine wet sanding to give it some tooth. Hand paint your scrollwork and splash with your airbrush. Clearcoat again!
Add the name as a vinyl print.
Posted by Neil D. Butler (Member # 661) on :
No Vinyl! Sheese Steve, you of all people! lol But everything else is spot on.
Posted by Stephen Deveau (Member # 1305) on :
I hear you Neil.
Then ad a platform to handpaint the name afterwards.
[ February 21, 2009, 01:35 PM: Message edited by: Stephen Deveau ]
Posted by Neil D. Butler (Member # 661) on :
Or even use a vinyl stencil and airbrush the name.
Posted by Dale Manor (Member # 4858) on :
I wish I could do things the easy way but that's a four letter word!
I'd love to be able to just stripe the details on but I want to use two particular Rod and Custom metallic pearl colors to develop the base pattern. Unfortunately, it looks like most all the striping colors come in solids only? If I could find a metallic pearl type striping paint in the right color I'd be glad to try it.
Here is a sample of what I am trying to achieve with the base colors....only I'm not going to get this crazy with it...or maybe I will?
So, I'd like to paint the two base colors on, get it smoothed out and then paint the details, fairy, and farkles on over top of it. Maybe I could clear with pearl between base and final details and then put a final coat of clear like you guys have suggested.
And no I won't be using any vinyl on the project....the stuff gives me the hives! If I can't find anyone local to cut out some lettering masks for me, I'll just do it by hand.
Sorry to be such a pain, but I want to get this right so I can do the fiberglass go-kart body without too much hassle.
thanks for your help.
Posted by Neil D. Butler (Member # 661) on :
Give's me the Hives.... lol... Good One!
Posted by Stephen Deveau (Member # 1305) on :
****Z
Talk about copyright!
Posted by Joey Madden (Member # 1192) on :
well for pearls in the red or pink tint I would use the original lead based Murano which can be bought through Sid Moses. That's right, lead based! Sid came in to a supply of NOS Murano by the gallon and with a little knowledge from a smooth talker you may be able to pick up the amount needed. Remember, this stuff ain't cheap and will probably be gone when or if you hesitate for any length of time. You can call Sid Monday morning at 800 628 2194 as he is out in the desert this weekend testing his new gold metal detector which he also sells. Sig Moses has been selling paint supplies for many years and also carries Paint-Sav and Sapphire oil I believe as he was the one who bought their formulas. He also bought Paul Muir's Dagger Lac line which is now called MoLac. Sid is an ol'dude so treat him nicely and is also a friend of mine.
Posted by Dale Manor (Member # 4858) on :
Thanks for the info Joey.
And Stephen.....just for that I'm not adding any barcodes either!
Here is my last attempt at airbrushing.....enough practice.
I'll just do the deal and post the results......c-ya then
Posted by Stephen Deveau (Member # 1305) on :
Sorry! next page.
[ February 22, 2009, 04:09 AM: Message edited by: Stephen Deveau ]
Posted by Stephen Deveau (Member # 1305) on :
I can understand the humour in this!
No 'Barcodes' allowed!
Here is one for you. using 'Createx Auto' plus Auto clear coats.
Posted by Neil D. Butler (Member # 661) on :
That's cool Steve!
Posted by Stephen Deveau (Member # 1305) on :
Table Cloth was done by my Mother-in-Law.
She was German and had the talent to sew or stitch..... Anything!
[ February 22, 2009, 12:56 PM: Message edited by: Stephen Deveau ]
Posted by Kurt Gaber (Member # 256) on :
Hi Dale,
I figured I better at least say hi even though I have nothing of value to add to your post about the helmet lettering. I haven't been on Letterville Bullboards for ages and I checked it out last week and saw a couple posts of yours and just wanted to say hi.
Ok, on second thought about the helmet... looks like an ambitious project! I did one for a guy in 2006 and that was the last helmet I airbrushed. I don't have much patience for helmet lettering working on the curves and getting things symmetrical... I did everything on that last helmet with One-Shot then added prismatique to the clear when it was sprayed at a body shop and it turned out very nice!
Hope things are going well for you in southern Wisconsin!
Posted by George Perkins (Member # 156) on :
Dale, have you tried brushing with the base colors??? Some work well with a sword or liner.
Posted by Peter Loran (Member # 7594) on :
quote:Originally posted by Dale Manor: Thanks for the pointers Dale.
i airbrush helmets.i like to use water based acrylics for the art work.auto air paints,createx,goldens,com art,all work well.can be clear coated with just about any thing cept for lacquer. as for mask stencil cutting.i like to used application tape.put tape on a piece of clear film acetate over head projection film.then run it threw the desk top printer.it print on the tape then i cut it out with an zacto knife.
i mask off the helmet with application tape and masking tape.
Anyone???? No airbrushers out there in Letterville??
Perhaps I'll have to call Australia for some tips.....Mr. Tickle......where are ya mate?
Posted by Bevin Finlay (Member # 2159) on :
hi Dale;
if i was doing that job and wanted to spray all the artwork instead of freehand striping the scrolls then consider this.
paint the entire helmet first in the darker violet color that you want the scrolls to be. plotter cut a bunch of the different scroll designs out of paint mask vinyl and weed away the background part keeping the positive mask. premask with a transparent mask.
now you can more easily apply the smaller sections of positive scroll design masks onto the helmet where you want those scrolls to be and then spray the entire helmet again in the lighter color that is to be you main background color.
unmask the scroll mask vinyl and carry on with your sparkles, lettering, etc.
apply that second color lightly and only enough to achieve the color and you should achieve a minimal and clean edge for your scrolls.
you might also want to spray a mid coat clear between each step so you are not masking directly onto a metallic paint surface.
put two to three coats of clear over the helmet. let it sit for a couple of days, wet sand smooth and clear again for your final finish. wet sand and polish if necessary.
hope this helps
Bevin
Posted by Dawud Shaheed (Member # 5719) on :
I've always wondered, how much would you charge for a job like this? It seems very labor intensive (at least to me, a window splasher) People ask me to do stuff like this a lot, but I always turn it down for different reasons, but mainly because I can't see charging enough for the amount of time I estimate it would take me. Just curious.
Posted by Dale Manor (Member # 4858) on :
Hey guys,
I did post some pics of the finished helmet on the portfolio page a while ago...maybe I'll tack a couple on here also...
Bevin, I think I used some of the techniques that you suggested? I did spray all the striping on for both layers of color. I also put clear on after the two base colors and then painted the other graphics on and cleared over the whole thing last. I did however cut everything by hand since I don't have a vinyl slicing machine!
And Dawud, I don't know how you can charge enough for these jobs unless you are doing them for Nascar stars? This helmet took me about 50 hours to paint and at least $500 in materials. I may not be the fastest rocket in the sky but I think I did pretty well for only my second helmet job. And It didn't help on the $$ to use $50 per half-pint flip-flop pearl paints!
Anyhooo, here are a few picks of the helmet and the little Monkey I call a Great-Niece who I painted it for...look at those eyes, you'd have done it all for free too right?
[ May 13, 2009, 01:06 AM: Message edited by: Dale Manor ]
Posted by Neil D. Butler (Member # 661) on :
That's incredible Dale, seems to me you got paid in full!
![[Smile]](smile.gif)