|
by Larry White |

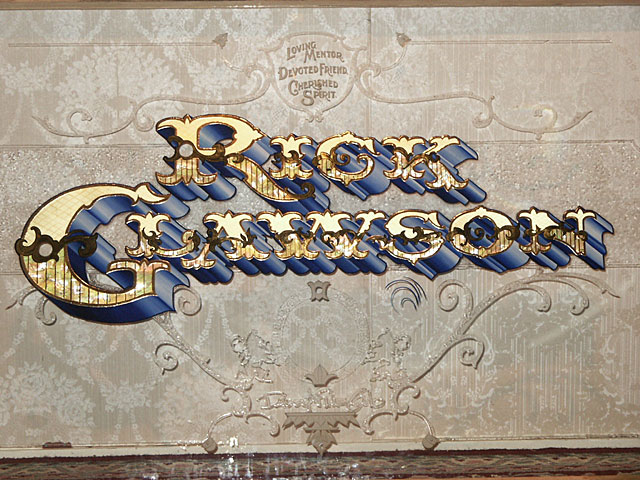
The following is a detailed
description of the process I used in the creation of the Rick Glawson
commemorative sign. Most all of the processes used were learned from
Rick Glawson with most of the basic knowledge obtained at Rick’s
California Conclave Letterheads meetings. Further knowledge of
techniques and processes has been obtained through continued practice of
this art, experiments, and communications with others in the craft.
There is definitely more than one way to do the outlined processes, but
I would like to share with you the steps and processes I used in the
execution of this sign.
|
||
Step 1 – Artwork Creation
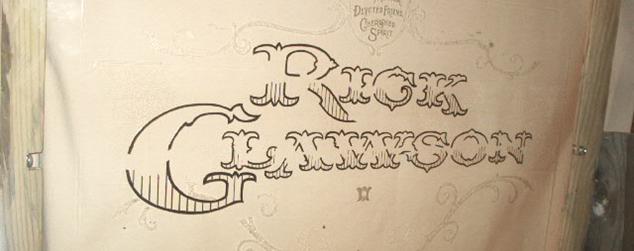
Illustration 1 – Pencil Layout Drawing The artwork for this sign was all hand drawn with pencil on vellum. The inspiration for the font on Rick’s name came from the George Brooke portfolio (see: http://www.theletterheads.com/glawson/brookmain.html) book he had displayed at one of the conclaves. It was the plate with the initial “L”. I designed the rest of the letters from that one plate. After drawing his name, I dabbled in several different layouts. I decided to employ a symmetrical style design. As I drew the layout, I also envisioned the techniques I would employ as well as the color scheme. It is important to define all of the elements of the finished piece in the layout. Every transition of color, outline, or texture is defined in the line art. Upon completion of the layout, I calculated the finished size for the glass. Often times the finished size is based on how fine of an outline I can paint. I then procured several oversized copies in reverse (off the large format copier at Kinko’s, set to the mirror option). |
||
Step 2 – Glass Surface AlterationMy vision for this piece incorporated various forms of glass surface alteration. These being; textured acid etching, multi-staged acid embossing, glue chipping, and sand carving. Alteration of the glass surface is always done first (but typically after any hole drilling or edge scalloping). I proceeded to procure a piece of Ľ” thick extra-clear (Starphire) glass approx 36” x 28” from a local glass supplier (Western States Glass, Fremont, CA). Using a mineral light, I determined the float side of the glass, as this is the side I wished to work on. I employed an asphaltum varnish resist for both the acid etching and glue chipping processes. I like to set this up using only one coat of asphaltum. This required executing the acid etching techniques first, followed by the sandblasting for glue chipping and the sand carving.
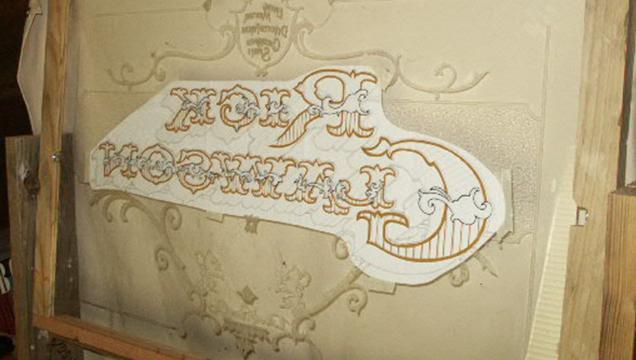
Photo SEQ Photo \* ARABIC 1 – Vinyl Mask for Acid Etching and Embossing The first step was to clean the glass. I like to just use glass cleaner at this point. I covered the entire glass with 3 mil Calon II vinyl, then registered and spray mounted one of the artwork copies over the vinyl. I proceeded to cut out the areas I wanted to acid etch. I had determined I wanted to do 2 textures of mica etching and a multi-staged acid embossing. Those areas are then left on the glass and the entire background weeded (see photo 1).
Photo 2 – Vinyl Weeded for Texture Etching The next step was to coat the entire glass with asphaltum varnish. Having been initially taught to apply the asphaltum with a roller, I have found I like brushing it on better. After varnishing, the areas defined for the textured acid etching were carefully weeded. -------------------------------------------------------------------------------
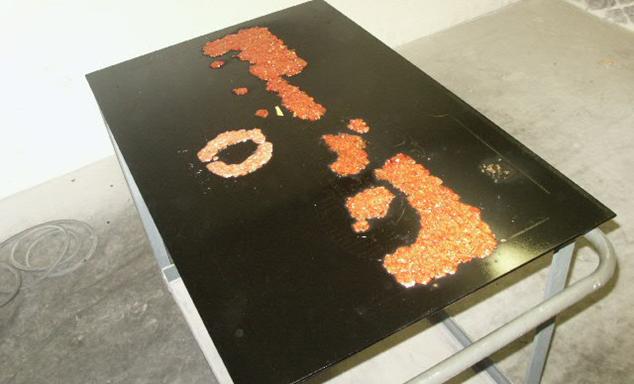
Photo 3 – Acid and Mica Mixture Applied to Glass
Textured etching is accomplished by adding diluted hydrofluoric acid
into mica flakes. Typically, 2 parts hydrofluoric acid (48-52%) is
diluted with 3 parts distilled water (red food coloring is typically
added as a safety factor). This is mixed into the mica flakes to form a
wet paste. The paste is then applied to the open areas of the glass. I
like to use a vinyl squeegee that has been cut in half. The mica flakes
settle on the glass and interrupt the action of the acid producing a
stippled texture. Mica flakes can be ground to smaller sizes to produce
different textures. The different sizes are mixed with the acid in
separate containers, but can be applied to the piece at the same time.
Here, a fine mica texture is being applied to the “ring”, and a coarser
texture is being applied in the center background panel. The mixture is
left on the glass for 20-30 minutes. It is scooped back into the
container and the residual is rinsed off with water. Be sure to observe
all precautions when using hydrofluoric acid. Read and understand the
MSDS sheet. Wear all suggested safety gear. Get professional -------------------------------------------------------------------------------
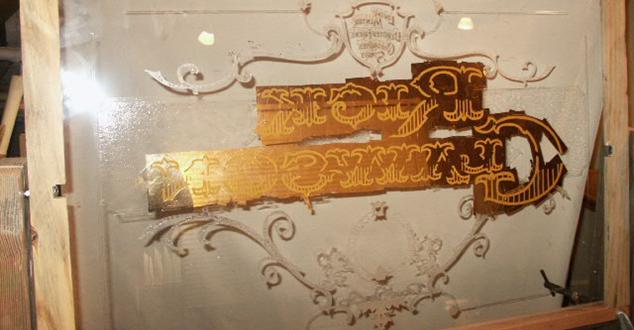
Photo 4 – Glass Weeded for Acid Embossing After rinsing and drying, the etched areas are painted over with asphaltum varnish (see photo 4). This preserves them during the acid embossing process. I had chosen to do a multi-staged acid emboss. The “deep” embossed portion was first weeded and after ensuring that all areas had been weeded, the front of the glass was coated with asphaltum varnish to protect it from any action of the acid. The glass was then placed face down in a leveled vat onto 1/16” spacer so as to suspend the face of the glass off the bottom of the vat. Then the same ratio hydrofluoric acid that was used before was poured into the vat. Acid was added until it just came up on the sides of the glass, sufficiently covering the entire underside of the glass. After the acid has been added to the vat, one side of the glass was lifted and re-lowered to ensure any surface bubbles were evacuated. After 20 minutes the glass was carefully removed from the acid vat and rinsed and dried. The fine lines in the lower portion of the main copy were then weeded and then the glass was then returned to the acid vat for another 20 minutes, removed, rinsed and dried. The resulting double emboss treatment resulted in the vertical lines in the lower portion of the text being half as deep as the rest of the embossed work. -------------------------------------------------------------------------------
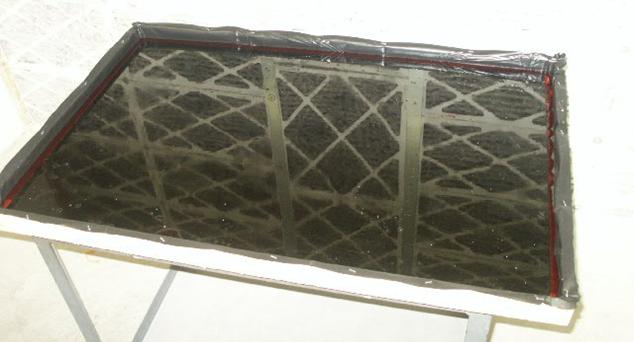
Photo 5 – Glass in Acid Vat (Note the red acid solution at the edges of the glass. Also, the reflection in the glass is the filters on the wall of our ventilated work area.) -------------------------------------------------------------------------------
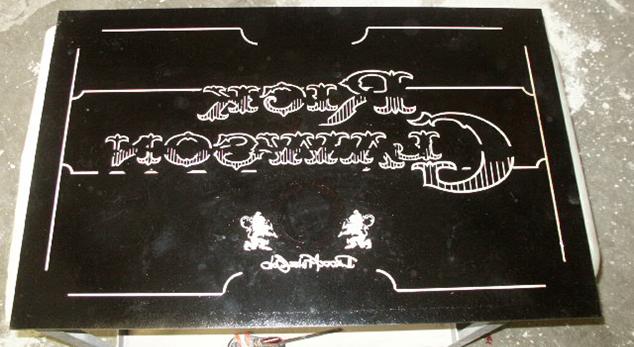
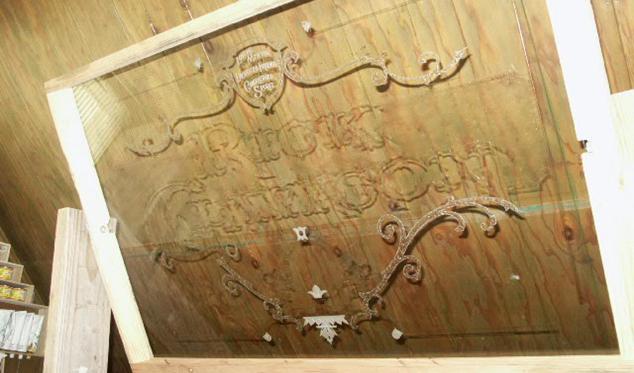
Photo 6 – Sand carved ornaments and Sandblast for Glue Chip A second application of rubber sandblast mask was applied over the surface of the asphaltum-coated glass. Another one of the reverse copies was registered and spray mounted to the mask. The depth carved ornaments and upper text was cut out and sand carved. The scrollwork for glue chipping was also cut out and sandblasted. The masking was then removed. Note: The clear acid embossed areas appear black due to the front of the glass being coated with asphaltum. -------------------------------------------------------------------------------
Photo 7 – Glue Chipping off of the Glass in the Booth Prepared glue was then flowed into the areas to be chipped. The glue was dried under a fan then placed into a glue-chipping booth. -------------------------------------------------------------------------------
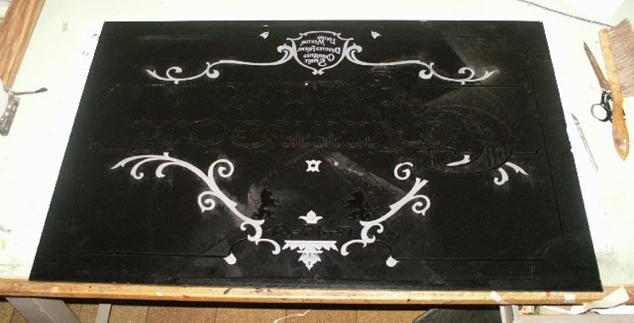
Photo 8 – Completion of Surface Alteration Techniques After the glue chipped off the glass, it was removed from the booth and the asphaltum varnish was cleaned off. This completed the first step of glass surface alteration. |
||
Step 3 – Rendering the Main Copy
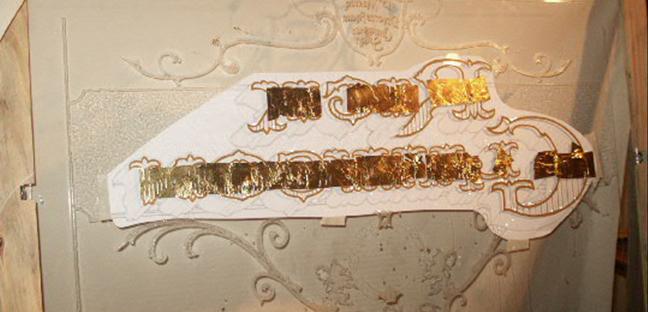
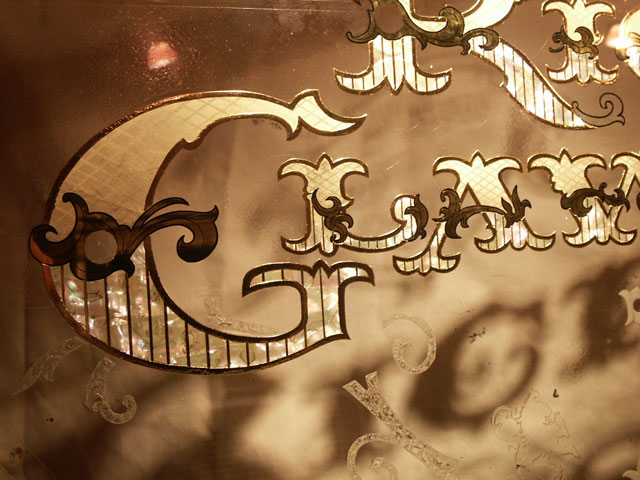
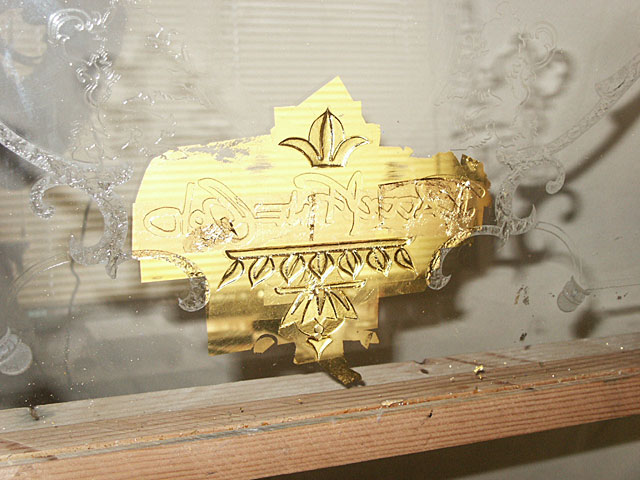
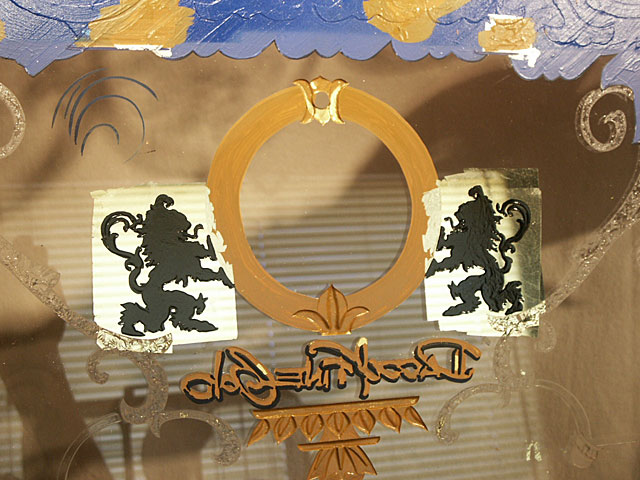
Photo 8 – Gilding Embossed Outlines The first step in this process was to gild the embossed letter outlines. These were water gilded with Manetti Rouge Gold. A double gild was required to completely cover the indentation of the embossing. -------------------------------------------------------------------------------
Photo 9 – Backed Up Embossed Outlines The gild is then burnished and backed up with Fine Gold Ochre Backup. -------------------------------------------------------------------------------
Photo 10 – The Gilded Embossed Outlines (viewed from front) The excess gold was cleaned off with a razor carefully run around all the edges to maintain a sharp edge on the embossing. This cleaned any gold off the surface of the glass only leaving the gold in the depression of the embossing. -------------------------------------------------------------------------------
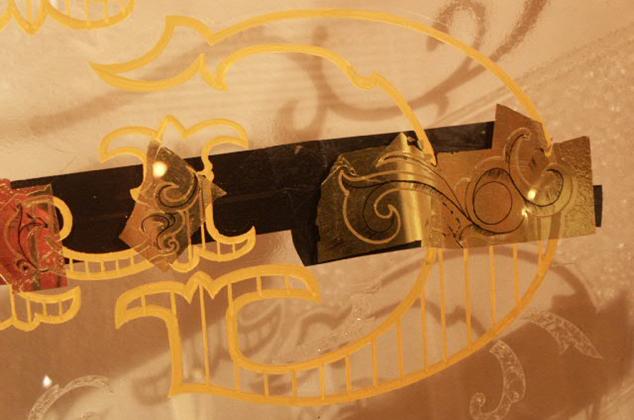
Photo 11 – Scroll Outlines Next, the scroll ornamentation outlines were painted in black. -------------------------------------------------------------------------------
Photo 12 – Water Gilded Scroll Centers The scroll centers were then water gilded with 23K gold. ------------------------------------------------------------------------------- Photo 13 – Shading Added to Gilded Scrolls After gilding, shading was added to the gilded scrolls. This was done by carefully scratching off the gold in the desired areas. Black vinyl was put on the face of the glass over these areas, which aids in visualizing the finished shading. A very fine sharp metal compass point was used to do the scratching. -------------------------------------------------------------------------------
Photo 14 – Completed Scroll Work Upon completion of the shading, the entire scroll areas are backed up with Fine Gold black back up enamel and the excess gold removed. -------------------------------------------------------------------------------
Photo 15 - Completed Scroll Work from the Front -------------------------------------------------------------------------------
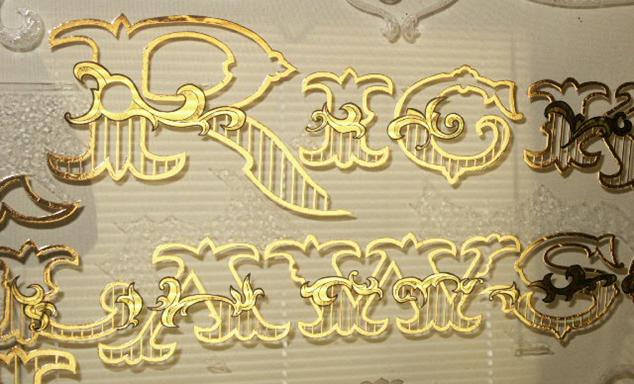
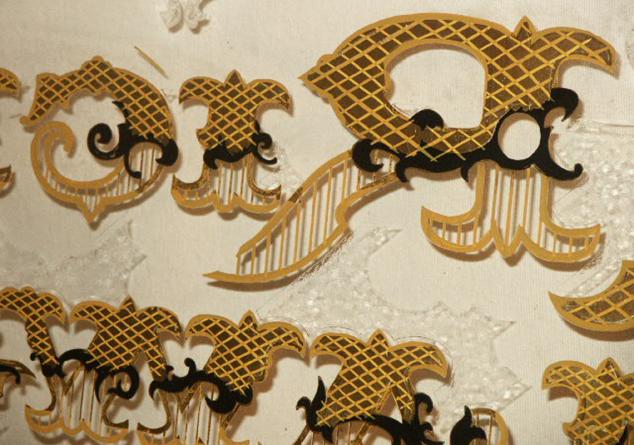
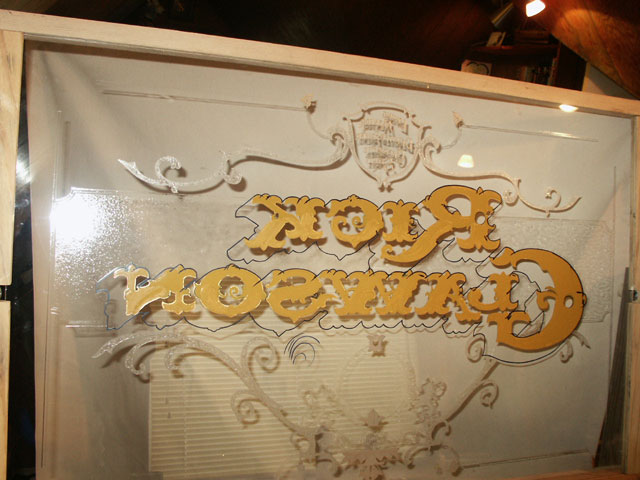
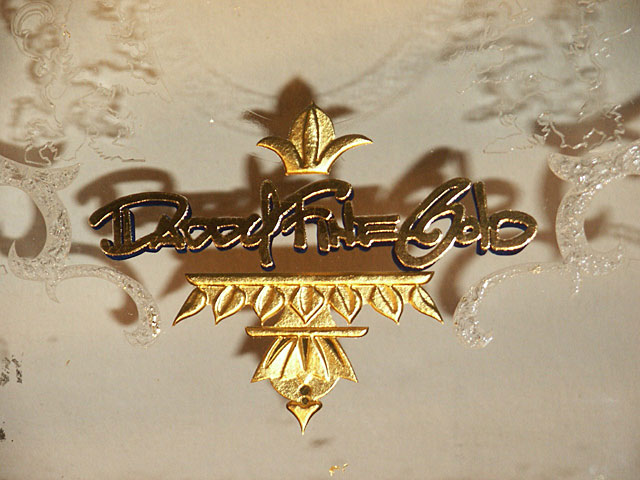
Photo 16 – Surface Gild Hatch Pattern Next, the upper portions of the letters were surface gilded with 18K gold. This gild was then burnished with a velvet pad in a diagonal direction from lower left to upper right. A crosshatch pattern was then painted over the gild. The gild was then re-burnished with the velvet pad in an opposite diagonal direction of lower right to upper left. After which the entire area was backed up. -------------------------------------------------------------------------------
Photo 17 – Surface Gild with Hatch Pattern from the Front -------------------------------------------------------------------------------
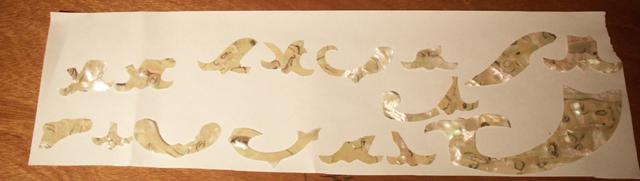
Photo 18 – Lower Letter Shapes Cut from Abalone Using one of the reverse patterns, the lower letter shapes were cut out of mother of pearl green abalone sheets. -------------------------------------------------------------------------------
Photo 19 – Abalone Adhered to Lower Letter Centers The pieces were then adhered to the glass with Frog Juice, after which the backs were surface gilded with composition aluminum leaf. -------------------------------------------------------------------------------
Photo 19 – Abalone Backed up with Aluminum Leaf -------------------------------------------------------------------------------
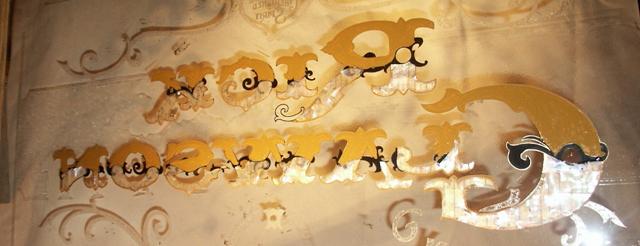
Photo 20 – Abalone from the Front -------------------------------------------------------------------------------
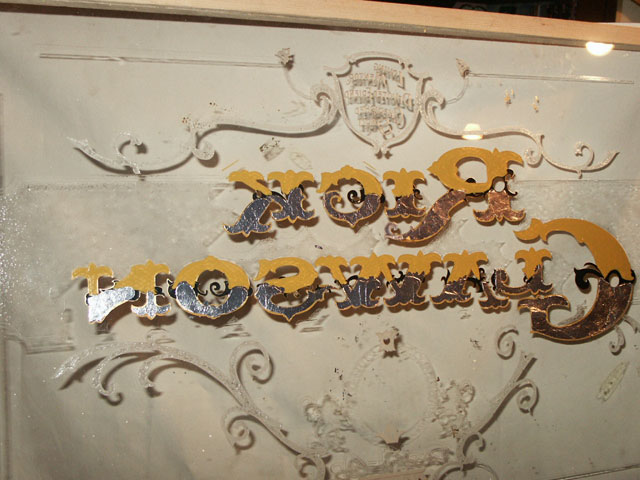
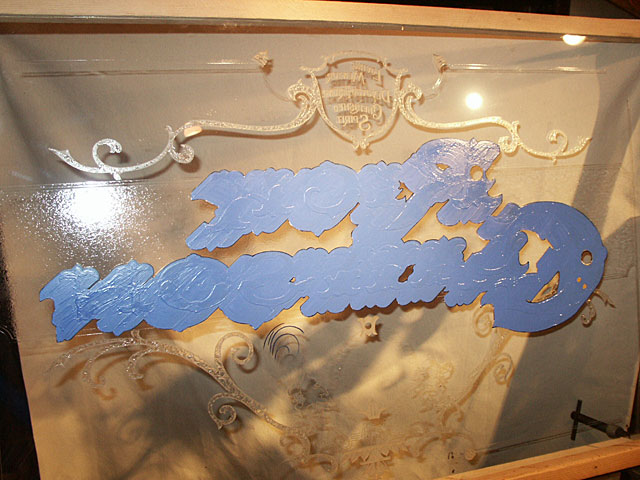
Photo 21 – Blended Shade Stop Line Next, the “stop” line for the blended shade was painted. -------------------------------------------------------------------------------
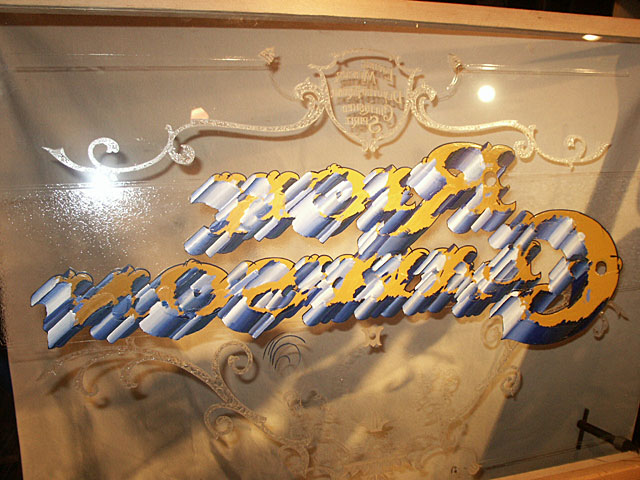
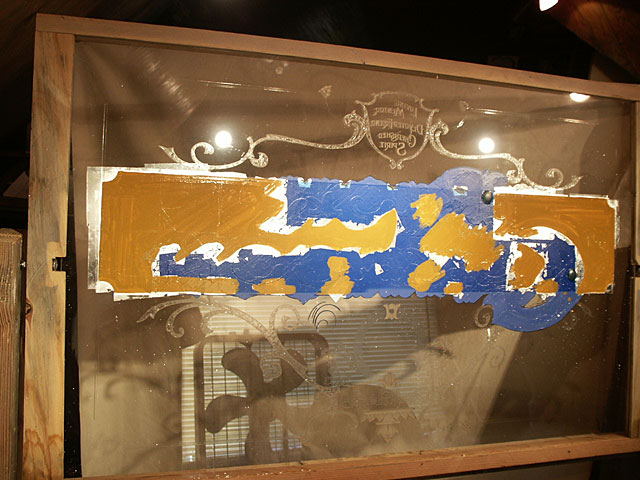
Photo 22 – Blended Shade Layout Using one of the reverse copies, I created a “road map” as to where to place the colors and the order of the areas to be painted on the blended shade. Colors were numbered 1 thru 4 and the sequence of application was figured to 4 sessions. (Anywhere you need to keep a hard line as the result of a corner in the design, it’ll need to dry before painting the adjacent color.) -------------------------------------------------------------------------------
Photo 23 – Completed Blended Shade Using a separate quill for each color and a separate blending brush for each transition blend, the colors were laid into and blended on all #1 areas. Continual inspection from the front was required to ensure a complete blend. After the #1 areas were dry, the #2 areas were applied in the same manner. Subsequently, the #3 and #4 areas were also completed. -------------------------------------------------------------------------------
Photo 24 – Backed Up with Middle Value Color The blended shade is then backed up with middle value color. ------------------------------------------------------------------------------- Photo 25 – Completed Blended Shade from the Front |
||
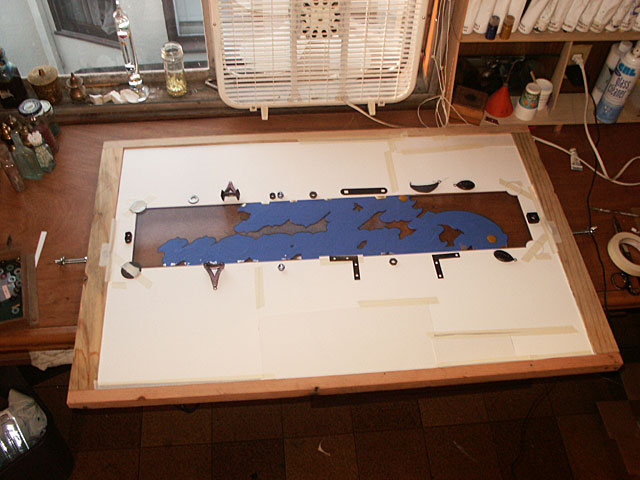
Step 4 – Colorizing Center Panel
Photo 26 – Masked Center Panel A cardboard mask was cut and set over the glass. ------------------------------------------------------------------------------
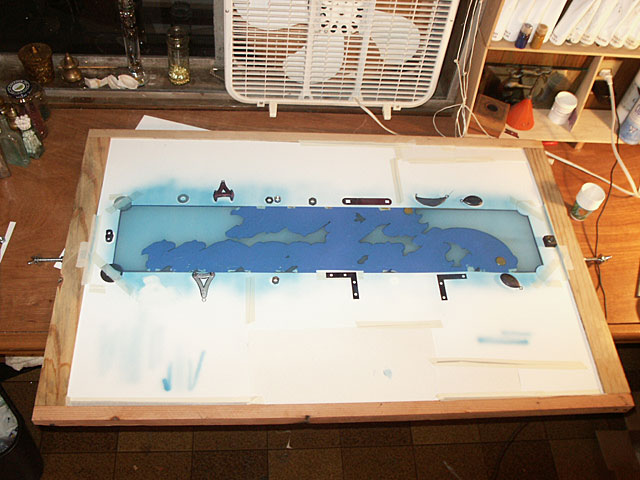
Photo 27 – Airbrushed Glaze A blue glaze was airbrushed into the center panel. ------------------------------------------------------------- Photo 28 – Glaze is Gilded with Silver Leaf The glaze was then water gilded with silver leaf. -------------------------------------------------------------------------------
Photo 29 – Gild is Backed Up The gild was then backed up. And excess leaf removed. |
||
Step 5 – Gilding Lower Sand Carving
Photo 30 – Sealing Sand Carved Areas First, the sand carved details were sealed with Frog Juice. -------------------------------------------------------------------------------
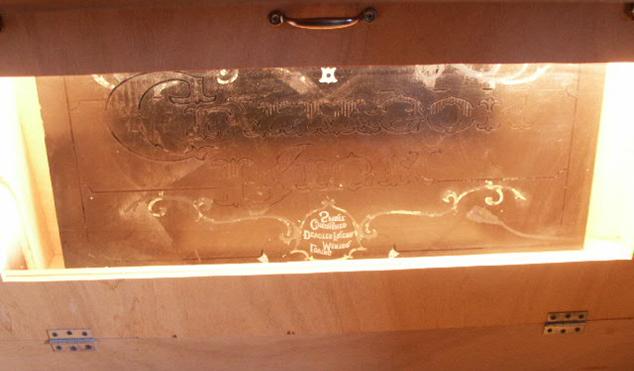
Photo 31 – Gilding of Sand Carving and Acid Emboss The sealed sand carving and acid embossed signature was then gilded 23K gold. -------------------------------------------------------------------------------
Photo 32 – Back Up and Drop Shadow This was then backed up, cleaned, and a painted drop shadow was added to the name. -------------------------------------------------------------------------------
Photo 33 – As Viewed from Front |
||
Step 6 – Gilding “Keeper of the Craft” Ring
Photo 34 – Blended Gold Ring The ring was gilded with a blend of karats of gold. Firstly, a strip (1” wide) of 16K gold was gilded in a 2 o’clock and 8 o’clock position with 23K gilded around the rest of the ring. After the gild was dry, a glass brush was used to delicately scratch off the gild forming a “shaded” transition (clear glass) between the 16K and the 23K areas. This clear area was then water gilded with 18K gold and the entire ring was baked up. |
||
|
Step 7 – Gilding Lions
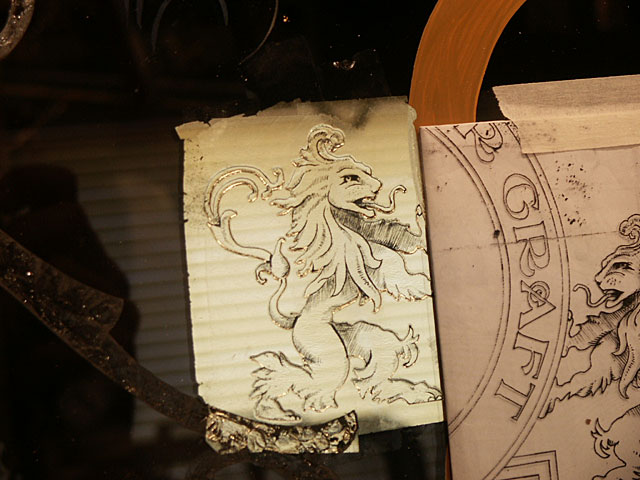
Photo 35 – Gilding the Lion’s Mane The lion’s manes were first gilded with Rouge gold. After this gild was dry, a glass brush was used to remove any gold that overlapped onto the lion’s body. The body was then water-gilded 23K gold. -------------------------------------------------------------------------------
Photo 36 – Shading Detail on Lions A very fine metal stylus was then used to scratch the shading detail into the lions. -------------------------------------------------------------------------------
Photo 37 – Lions Backed Up The lions were then backed up with black back up paint. -------------------------------------------------------------------------------
Photo 38 – Completed Work So Far
|
||
Step 8 – Gilding Glue Chipped Scroll Work and Borders
Photo 39 – Gilded Scrollwork The glue chipped scrollwork was then water-gilded 18K gold. -------------------------------------------------------------------------------
Photo 40 – Scrollwork Backed Up The gilded scrollwork was then backed up. The small lower ornaments were also gilded at the same time. The lower areas were done first, then the glass rotated 180 degrees (upside down), and then the upper areas were done. This kept the water size from running down over the previously completed work. -------------------------------------------------------------------------------
Photo 41 – Lower Borderlines Gilded The embossed borderlines were also gilded with silver leaf, backed up and outlined. |
||
Step 9 – Gilding Carved Text
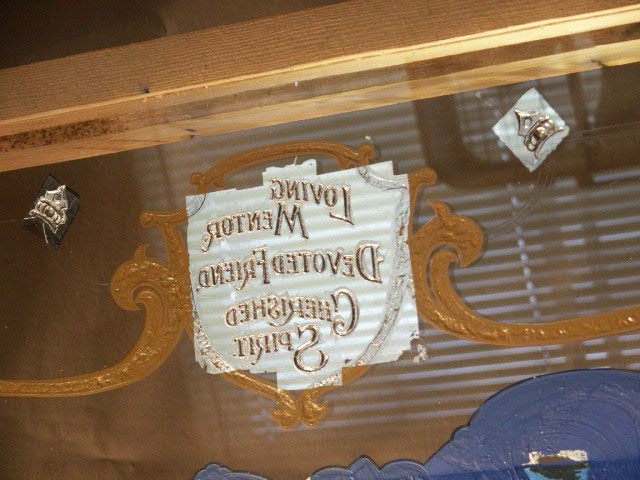
Photo 42 – Upper Panel Text Detail The text in the upper panel was sealed with Frog Juice then water gilded with palladium leaf. -------------------------------------------------------------------------------
Photo 43 – Upper Panel Background A drop shadow was then added to the lettering. Using a spatter brush, the background was lightly spattered to resemble stars in the sky. The background was then brush blended in various shades of blue. |
||
Step 10 – Rendering the Secondary Center Panel
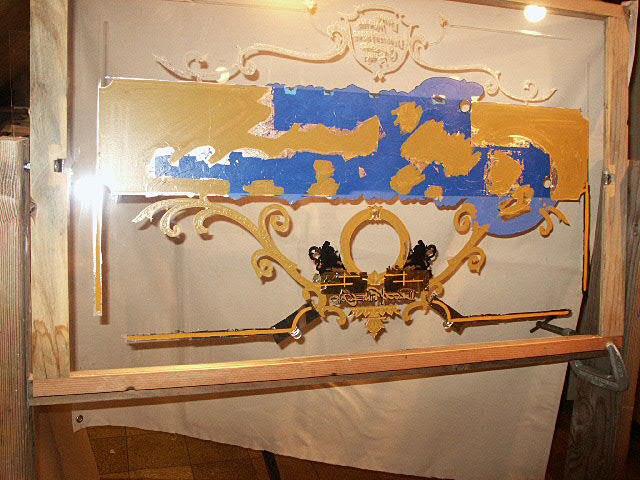
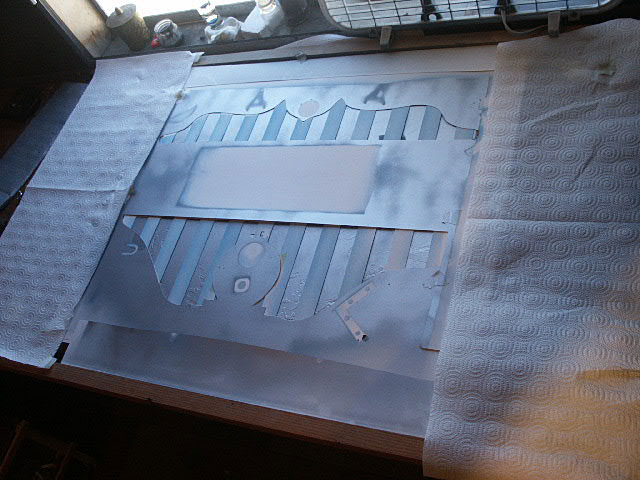
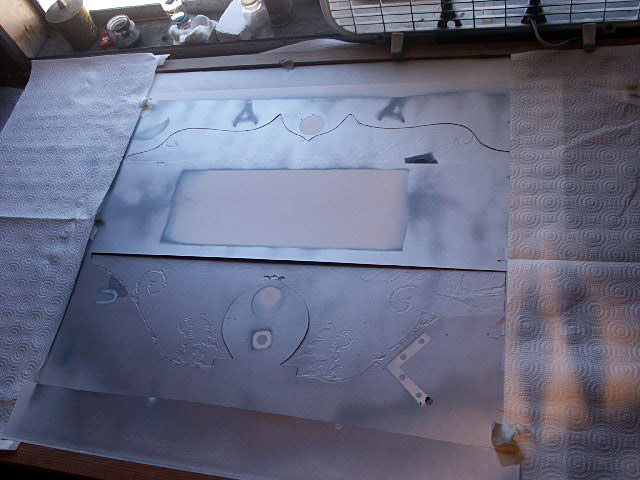
Photo 44 – Background Panel Stripes Masked and Glazed A mask was cut and applied to the area to be airbrushed. A light blue glaze was airbrushed into the open striped areas. The striped portion of the mask was removed and the same blue glaze was airbrushed over the entire area. (The stripes receiving more coats of glaze appear darker although the glaze color remained the same.) -------------------------------------------------------------------------------
Photo 45 – Panel Backed up with Silver Spray Paint After the glaze, the entire area was backed up with metallic silver spray paint. |
||
Step 11 – Corner Ornaments
Photo 46 – Corner Ornament Detail The corner ornaments were initially water gilded. Then the corner was treated with copper flitters and a faceted jewel. The outer ring was treated with glass glitter, after which the entire corner was surface gilded with 18K gold. |
||
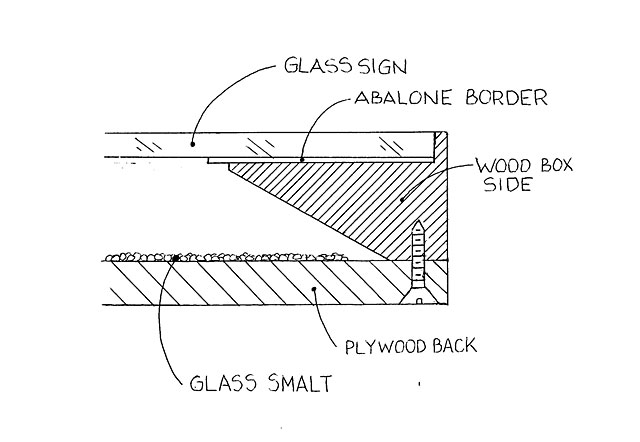
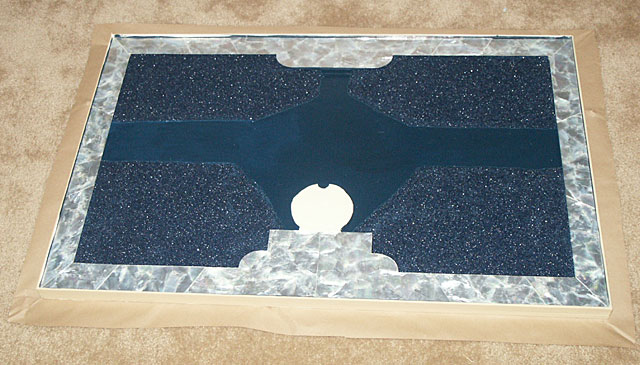
Step 12 – Smalt BoxA custom box was created to hold the abalone border and the portrait right up against the back of the glass while leaving the remaining areas recessed for the glass smalt background. The sides of the box were undercut to allow the glass smalt background to vanish underneath the abalone border and so that the sides of the box would not be seen when viewed from the front.
Illustration 47 – Section View of Smalt Box -------------------------------------------------------------------------------
Photo 48 – Fabricated Smalt Box After the fabrication of the box, the inside was painted blue to match the glass smalt color. Blue glass smalt was then adhered to the areas in which it would show through the clear areas of the sign when viewed from the front. Abalone sheets were cut into strips and adhered to the “shelf” in the smalt box using a double-sided adhesive film. A circle of rubber sandblast mask was used to ensure that the portrait picture was pressed firmly against the glass. -------------------------------------------------------------------------------
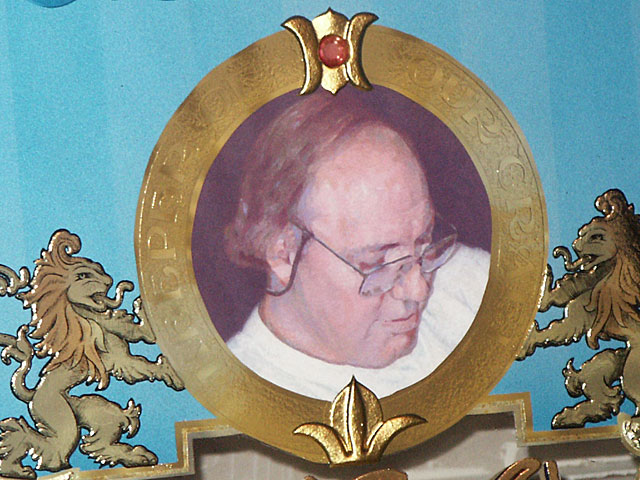
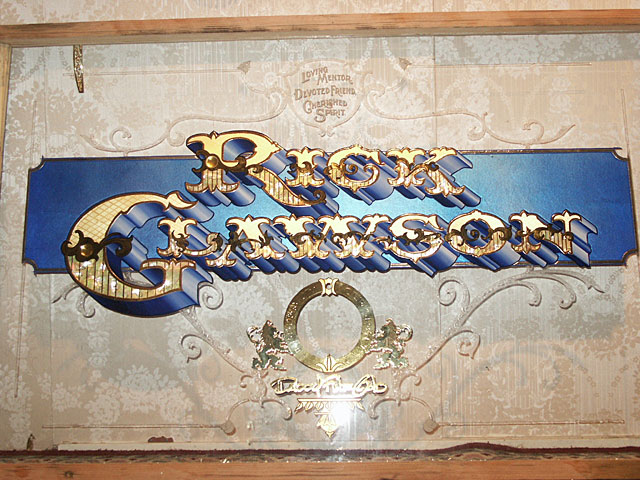
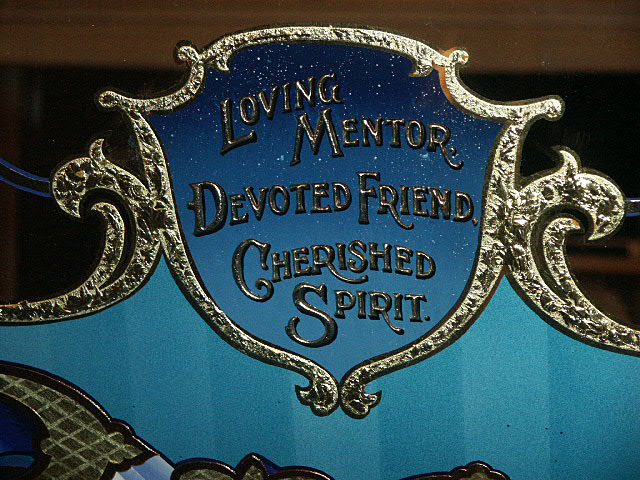
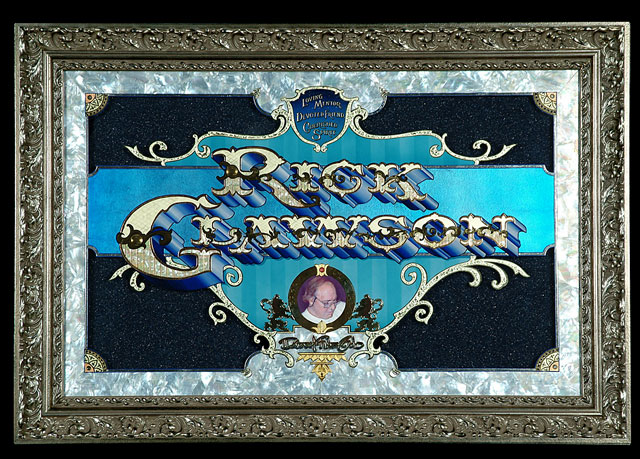
Photo 49 – Completed Sign The glass was cleaned and inspected. The portrait (courtesy of Harry Malicoat) was positioned and secured to the back of the glass. The glass was then placed into the smalt box and affixed with a strong masking tape around the sides (which would be covered by the frame). The piece was then professionally framed at City Picture Frame in San Francisco, California. Happy gilding!
Larry
White |
||
[ Letterville | Join Us | Bulletin Board | Letterhead People | Merchants | More Step-By-Steps ] Copyright © 2009 The Letterhead Website |